Recipe Reminder: Cod Grenobloise

This was a complete winner. I've shied away from lemony dishes recently, but this French classic dish delivered an incredibly balanced, tart, and exciting flavor profile.

I am not sure how this video ended up in my "to watch", but it did and I pretty much followed Adam Byatt's approach. The dish comes together quite quickly after the mise en place is set.

Before starting, pull out the cod and pat it dry. Coat it liberally with a 60/40 blend of table salt and sugar (25 g table salt, 15 g sugar) and allow to cure for 12 minutes. Rinse, pat dry, and rest (for best results uncovered overnight).

Active time: 25 minutes Serves: 2

  • 250 g – Fresh Cod fillet

  • 100 g salted butter (good quality)

  • 1 lemon – segmented with the juice reserved

  • 20 g capers

  • 20 g cornichons, diced

  • 2 slices of sourdough, small dice

  • 20 g flat-leaf parsley, finely minced

  • 20 ml white wine

  • 100 ml fish stock (or suitable replacement)

Melt half of the butter in a sauté pan and toast/sauté the diced sourdough over medium heat until golden and crisp. Drain well.

Once removed, heat up some good quality olive oil on medium-high. Pat the cod dry and place flesh-side down and do not move for 6-8 minutes. Allow the flesh to take on a good color and crust and it will release when ready. Remove and flip so skin-side is down in an ovenproof dish (I used a small sheet pan with a layer of parchment). Add fish stock and put additional chunks of butter on the fish. Braise at 320-350F for 6-8 minutes, remove and rest.

In the same pan, cook the remaining butter to a beautiful brown. The way to tell this is that the butter will foam, and as you swirl it around to keep it from burning, the foam will part. As soon as the foam parts, immediately squeeze/add the lemon juice — there will be spattering — and then the white wine. Shake vigorously to emulsify. Rapidly stir in the diced cornichons, capers, lemon segments, croutons, and parsley. Warm up slightly if needed!

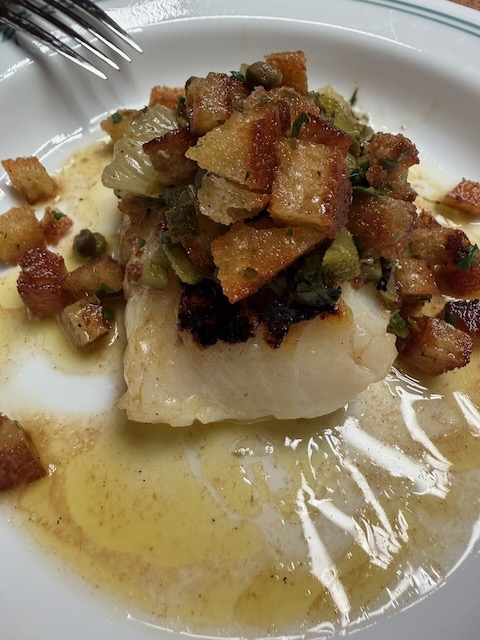
Serve fish (skin removed) over warmed up cauliflower purée on the plate, then spoon the sauce over the fish. Finish with a tad bit of good quality olive oil. It's tremendous. The piquant character of the sauce elevates the fish from "okay" to transportive. We had leftover sauce and as the night went on we ate spoonfuls of it alone.

Recipe Reminder: Twice Fried Chicken

This isn't truly a recipe, but more of a self-reminder of how well Air Fryer Ssamjang Twice-Fried Korean Chicken turned out tonight. The key part of the recipe was the sauce, noted below and modified.

Active time: 25 minutes per batch (2-3 batches) Serves: 4

  • 8 Tbsp. ssamjang (2 Tbsp. gochujang + 2 Tbsp. of ketchup or bean paste)

  • 4 Tbsp. honey

  • 4 Tbsp. brown sugar

  • 2 Tbsp. soy sauce

  • 1.5 Tbsp. sesame oil

  • .5 Tbsp. Green Sichuan Peppercorn oil

  • 2 Tbsp, fresh ginger, grated

  • 4 tsp. Fresh garlic, minced

Combine all together, blend until smooth if you want to waste a clean blade. I halved the recipe for Jeremy and I.

For the chicken:
Mix salt, pepper, and 6 Tbsp. of cornstarch or potato starch in a sealable container.

Pat dry chicken thighs, then toss with a small amount of oil.

Put the oiled chicken thighs (skin on is better) into the container with the cornstarch mixture. Shake until well coated.

Preheat air fryer to 375℉. Shake off excess starch and place chicken into the air fryer basket. Air fry for 15 minutes. Flip, air fry for another 7 minutes at 400℉. If you need more time, give a little spray of oil to the chicken and then go another 7 minutes.

Remove, dip into half of the above sauce, then serve with a side of rice.

Back to Basics: Eggs in Anchovy Cream

Print

Back to Basics: Eggs in Anchovy Cream

Part of winding down my graduate studies has been a return to exploring new recipes at home. The time constraints of a full-time job and a part-time graduate program had lead to a more narrow set of meal options than usual. Now, free of that, I’ve taken to picking up occasional recipes from Instagram folk, like Corre Larkin, or cookbook authors (Jon Kung or Khushbu Shah).

What I like about food social media during this phase is the “share and share credit” approach. Corre posted a short video of Eggs in Anchovy Cream Sauce, crediting April Bloomfield, showing the approach and introducing me to a chef (and her book).

This recipe comes together quickly and is great with some sourdough “soldiers”.


Finished dish, depicting two eggs in anchovy cream sauce.

  • Author: Austin Brower
  • Prep Time: 5
  • Cook Time: 15
  • Total Time: 20 minutes
  • Yield: 2 1x

Ingredients

Scale
  • 1 (large) garlic clove (crushed, peeled, and finely chopped)
  • 1tsp fresh tarragon leaves
  • 1T unsalted butter
  • 2 and a half whole anchovy fillets (rinsed)
  • 6T heavy cream
  • 1/4 tsp finely grated lemon zest
  • Some paprika
  • 4 eggs

Instructions

Preheat oven to 400degF

Prepare a bain-marie with an oven proof 9″x13″ casserole dish.

  1. In a smaller saucepan, add 1T unsalted butter and bring to foam on medium-high heat.
  2. Add finely chopped garlic and allow to slightly brown (while stirring) ~1min.
  3. Turn off heat and add rinsed anchovies, breaking them up with a spoon or spatula.
  4. Add cream and lemon zest and stir to combine.
  5. Snip in tarragon leaves to your taste.
  6. Bring to boil on medium-high heat and then remove.

As the anchovy cream sauce slightly cools, prepare two large ramekins by rubbing butter on the inside to prevent sticking.

Add anchovy cream sauce to the ramekins, then crack in two eggs into each ramekin.

Top with some chili salt or paprika.

Place ramekins into the bain-marie ( I used boiling water ) and place into the oven.

Bake about 15 minutes, remove, and then allow to carry over cook while toasting some bread!

Top with some additional tarragon if desired and serve alongside sourdough bread “soldiers”; dip in and consume.

Notes

I used two larger ramekins for this, each of which easily held two eggs and the anchovy cream compound.

As ovens may vary, keep in mind that you’re trying to get a runny yolk or jammy yolk. I found longer than 15 minutes in the oven lead to yolks that were just a little too done.

Did you make this recipe?

Share a photo and tag us — we can’t wait to see what you’ve made!